Thursday, May 10, 2018

Finishing the floor

recording original songs

We had to wait all winter to finish the floor in the studio. In the meantime, with the help of a lot of mats and a small oil-filled heater, the studio has been the scene of numerous recording sessions, jam sessions, art projects, drum rehearsals and photography sessions. This week Michel took the few bits of furniture out and washed the lovely red pine floorboards
art session Feb. 24, 2018
he'd put in last fall. And with a rag he oiled the floor with Tung Oil. This in my quest to avoid toxic materials and also because it is always easier to re-oil than to sand and re-varnish. And after a few coats of oil we'll head back inside to see how the studio responds to our humid hot summers. We have a lovely ceiling fan and two small windows for a cross current, with an option to fit a small airconditioning unit in one if we need to. But perhaps the fan will be enough.

freshly oiled pine floor

Tuesday, August 29, 2017

Interior finish

There was a long pause for winter and some learning to do regarding electricity. Eventually Michel put in a few electrical outlets and a box which have not been hooked up yet. Next came several bags of Safe 'n' Sound insulation. And then he had some gyp rock/ drywall board delivered and put that up. He had a lot of help from our oldest son with the drywall board. JJ made very accurate measurements so all the outlets were easily chopped out of the drywall.


Next they began putting in the drywall compound and taping the joints. We ran into a snag here, as JJ broke out into hives after a day of sanding plaster. So that's it for his career as a drywall compound plasterer. Luckily some Benadryl, a lot of aloe vera cream and getting away from the nasty dust solved the problem fairly easily. Makes one wonder what is in it though. Thankfully it is all covered up in white primer for now.


And finally Michel finished the last wall with pine boards, a rustic look that also has the advantage of being very solid and handy if we plan to tack things up or build a mezzanine.


Tuesday, November 8, 2016

Our backyard art studio

It's done! We have the lovely yellow door we planned. It was something that drifted by on Pinterest one day and we both said, oh, wouldn't it be cool to have a door like that? And now that the city is golden everywhere with autumn leaves it seems really even more apt.


Monday, November 7, 2016

The door

I was hoping we'd find a pretty old door in a back alley but it never happened so on one tedious journey to Reno-Depot that turned up not much I decided we should at least grab their inexpensive steel exterior door to justify our Communauto expense. That resulted in a very uncomfy car ride for me all bent over in the backseat so the door could fit in the little car. But it was cheap and primed too!


Now, one of the reasons for this bargain is that it doesn't have a key hole already drilled into it, something which Michel has pointed out to me several times. And his quest for a drill kit for key hole making was long and arduous. Even more tedious was trying to get his drill bit back out of the keyhole kit after drilling the first part. So yeah, was the inexpensive door such a great deal after all? I'm not so sure as the key hole kit was about 50% of the price but then again, now he can start a small business in drilling doors because he's got the gear. Ahem.

The quest for paint to fulfill our dreams of matching the door to the autumn leaves was also rather long and complex but the managers at Rona on rue Rachel were creative in their solution for a Grade 4 paint that could hold the strong yellow colour. So we have the lovely door we intended!

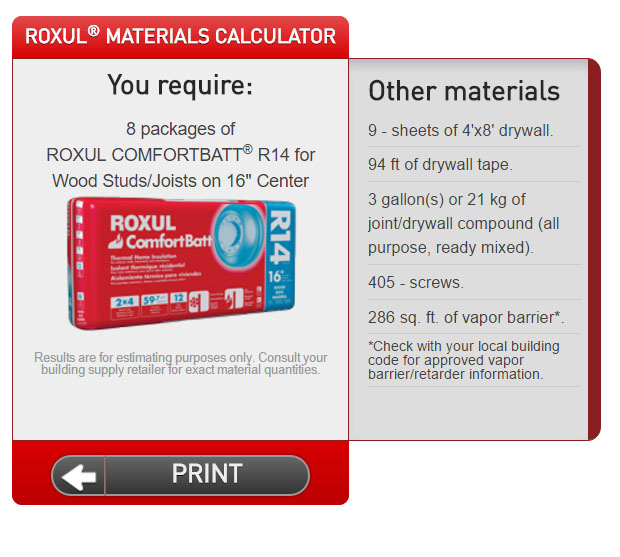
I have been researching all kinds of new materials now in my planning for finishing the interior. I have spent much too much time considering foil-covered bubble wrap as a quick and easy solution to insulating the studio a bit. But I then had a dream about people complaining about noise from my sound system and woke thinking bubble wrap was probably not the best acoustic solution. So now I have priced out finishing the inside of the studio with Roxul Comfort Batt and they also have a great calculator there to let me calculate the cost of the drywall, vapour barrier etc. None of this is a rush as Michel doesn't have time for more construction right now anyway. He has a musical composition to complete in the next few months.

But in the Spring I will pull out my notes and consider our budget or lackthereof then. I want it to all be as chemical free as possible and came home from Home Depot with some colourful foam daycare mats to toss on the plywood floor for now. This triggered fond memories of kindergarten for our youngest son and so if we don't use them in the studio we can always put them in his room as he feels attached to them.

Sunday, October 30, 2016

A couple of little windows

One of my obsessions with the studio design has been a cross current. I can air our house so nicely by opening a few small windows. So the shed will have a mini-version of this option.

Yesterday Michel cut a hole in the siding and installed the first of these, a cheap window from Home Depot that opens easily. I had hoped it would be able to hold an airconditioner in the summer but now that it's up I am not so sure. We'd have to put our little airconditioner sideways in order for it to fit and it's not clear whether the upper glass can easily be removed to fit around an aircon unit. So maybe we'll see next summer.

Today he's installing a small sliding shed window that he got half price from Reno-Depot. It will overlook the ruelle behind our house so some people protest that it's a bad idea, ruining privacy. It's very far away from the neighbours on the other side and not even flush with our fence so set further back than the front windows of our house, for example. And I plan to put a curtain or to put a frosted glaze on it. So after going around in circles about it we've agreed to try it. It really is vital to the cross current! In cold weather like we're having at this time of year that doesn't seem as compelling but in the summer it could make all the difference in the world.

There's a bit of painting to be done on the outside, a door handle, an eaves trough and then we can tidy up and sit inside and ponder the interior. Figuring out materials for that is a whole 'nother puzzle.


Sunday, October 23, 2016

After a month away ...

Shed building was interrupted by Michel's need to be in Korea and Japan to play drums. But now, after some time managing jetlag and a busy teaching schedule, he's back in the yard. Unfortunately our area has been hit by a few storms gathering and banding together these past few days, meaning endless rainfall. He put up a tarp and worked inside the shed to put in the big picture window.

Next he's back inside to trim the siding for the last wall, the front wall. And the good news is that the skylight doesn't leak at all. It seems the Ondura panels on the roof may collect water along one seam so that is to be tweaked somehow. Still a bit of a puzzle.


Saturday, September 24, 2016

Finishing the roof

The roof is very important in a climate like ours with all the snow in the winter. So there are many layers to the roof. First some lovely pine planks that will show from inside the studio.


After that, the pine is covered by sheets of plywood. And then a waterproof membrane coats the plywood. This is then topped off with tile.


We opted for a new product, Ondura corrugated roofing panels. To be honest, when our new neighbours used them for part of their fence we were very disapproving. They look a bit like a fibreglass product and seemed oddly thick on the fence. But in a stylish red colour on top of our little blue studio, requiring many less nails and less time than crazy heavy asphalt shingles, well, it was a bit of a no brainer.

The fact that they are corrugated proved a puzzle for Michel around the top of the skylight. He couldn't find proper flashing instructions for a situation like this so he spent much of today trying out different flashing ideas and pouring water from a little pan along the skylight frame. So that was annoying for him until finally he was happy with the flow and decided he could nail down the panels. The panel nails are very long so he lined up his nails with the beams underneath otherwise they would have popped out on the other side through the pine planks.


The skylight is in place now. The inside of the shed is looking pretty messy after all the fiddling with flashing etc. Only a few more steps to go and much less ladder!